Humidifer install. We purchased the Honeywell HE306 the install went really smooth. Took about 2-4 hours (I didn't do it all in one day).
Sunday, November 3, 2013
Monday, September 2, 2013
Timber Continued
We still have not finished removing the debris from the front yard. The day the trees were cut down I managed to remove one tree, however the second tree had a lot of poison Ivy growing on it. So I decided to let the ivy dry up for a few days. Well that turn into a few weeks and here we are today with the tree still there.


Tuesday, August 20, 2013
TIMBER!!!!!
So when we purchased our house over 2 years ago we had one dyeing evergreen tree on the side of our house. Over the next few months that tree completely died and whatever caused the first tree to die, started killing our other evergreen tree. Around this fall we it was pretty obvious that both trees were now dead.
Here is a picture of the trees on either side of the house.

Having two dead trees in front of our house was the advertisement for every tree trimming, yard cutting and landscape company who happen to drive down our street to stop by our house. And since their quick sale pitches were normally done during regular business hours I was always the person to answer the door to some sweating contractor with a truck and a chain-saw.
(The thing of housewife nightmares to tell you the truth.)
So last Saturday I decided to spend some time with my mother doing garage sales, thrift stores and general antique shopping. It's one of my favorite things to do with her and since it was her birthday weekend I was able to kill two birds with the same stone. So I'm out and about when I get a call from Phillip.
Phillip: Hey, Gloria what was the quotes from some of those contractors for taking down the two trees?
Me: I'm don't remember exactly, but all within $1,000- $800. I think I got a quote for $600.00 once, but the guy looked a bit shady.
Phillip: Cool, just saw these guys down the street.... said they would do it for $400. Only thing is they won't carry off the wood.
Me: We go ahead and do it.
That was the whole conversation. Below enjoy the pictures.
in progress

in progress

After

Thursday, July 4, 2013
Bye, Bye Metal Junk!
So last fall we had an old 1995 Jeep. It was running down and had a bunch of problems with it. Our neighbor across the street had a 1996 Jeep. Most of the parts were the same so we bought the 1996 Jeep for $500.00 as a spare parts vehicle for our Jeep.
Phillip gave up on saving our 1995 Jeep a few weeks later after attempt after attempt of fixing it to no avail.
We junked the 1995 Jeep for a few hundred dollars and sold the tires for a couple hundred as well. But we had this 1996 Jeep sitting in our driveway. See pictures:


 As you can see it is a piece of junk now. We salvaged a lot from it. Now it is time to get it out of our driveway before the neighbors call the code enforcement on us :)... just kidding our neighbors are really sweet.
So we got rid of not only this junk Jeep but all the old copper pipes and wires when we gutted the plumping and wiring in the house. We also had some type of pump from the 1920's in our basement that we also took to the salvage yard.
The money was helpful but the best thing is driving up to the house without looking at that piece of junk or going downstairs to the basement without tripping on old pipes and wires.
***Refreshing***
Phillip gave up on saving our 1995 Jeep a few weeks later after attempt after attempt of fixing it to no avail.
We junked the 1995 Jeep for a few hundred dollars and sold the tires for a couple hundred as well. But we had this 1996 Jeep sitting in our driveway. See pictures:


So we got rid of not only this junk Jeep but all the old copper pipes and wires when we gutted the plumping and wiring in the house. We also had some type of pump from the 1920's in our basement that we also took to the salvage yard.
The money was helpful but the best thing is driving up to the house without looking at that piece of junk or going downstairs to the basement without tripping on old pipes and wires.
***Refreshing***
Wednesday, June 26, 2013
Air Conditioner
So as we find new and affordable projects around the house to do we became aware that our air conditioner was sticking out like a sore thumb on the side of our house. We.... ok I wanted something a little nicer looking and something to protect it from the puppies. As we mentioned we now have 3 dogs. 1 older dog and 2 puppies. That being said the puppies have been busy digging around the air conditioner. See picture for reference:

So off the Lowe's we go! We went over a ton of possibilities and their corresponding prices but in the end we found these ready made fencing. See picture below:


Here is the link to lowe's if you are interested in purchasing these as well.
www.lowes.com
Barrette 46-in x 32-in White Vinyl Fence Panel
- Fence Panel
Item #: 41009 | Model #: 73004316
Overall Rating:
Overall Rating:

3.9 / 5

$19.97
At $20 each they were a bit expensive, but when we factored in the time it would take in order to cut, sand and paint wood we sat down and admitted that we were a bit tired a lazy. It's hard with 2 kids under the age of 3 to get the time to do any type of project. Someone has to watch the kids while someone else has to do all the heavy labor around the house. So... is it d.i.y. ?.... Not really, but we did stick them in the ground ourselves :) !!!! I think that counts.
Friday, June 21, 2013
Ceiling Fan #2


LOL.... that is d.i.y. for you.
All smiles so far.
Thursday, May 30, 2013
Ceiling Fan Light
I was at my wits end. I really didn't want to take the fan back down to see if I made a mistake with the wiring. For a quick recap, The other day the ceiling fan was installed however the light wouldn't turn on. The fan itself worked. So I figured there are 4 possible solutions.
- The light bulbs are no good (unlikely)
- There is an open wire (very likely and more than likely where the connection to the fan is)
- I did the wiring wrong (possible)
- The light switch itself is bad.
I started with the first took a bulb out and shook it gently sounded okay. On to the second option. I really didn't want to take that fan down. It felt like it took 2 hours to put that fan up and there is no easy way to get to the wiring of the fan with out taking the fan down. So on to number 3. I searched the internet for the switch i was using. It is a hunter 4-speed fan control and light dimmer model number 27183. There were a few threads in forums of people using the same switch. And according to what I found my wiring was correct. So I pulled out my trusty multimeter to check for voltage. The wiring for the fan showed the correct voltage. The wiring for the light showed 0. Took me a while to figure out how to turn the thing on sadly. there is a on off switch and then there is the speed control for the fan and the dimmer for the light. So during some of the testing I had to keep looking at the fan it self to see if the blades were turning to make sure I had the switch actually on and the speed/dimmer at the right place. So I figured maybe the switch is bad. For the various position I checked the resistance for the switch. My multimeter and leads showed about 1.6 ohms before connecting to the switch. The fan at high speed showed about 1.8 ohms. The light in the fully on position showed an open circuit!!!
So I decided to swap out the hunter switch for two regular cooper light switches. Thankfully I installed a larger electrical box since I wanted future space. For what I don't know but i like being prepared. I redo the switches so now i have a switch for the light and a switch for the fan. Everything looks good. I turn the power on and hit the switch. The fan works. The lights don't. Thought maybe I didn't get a good connection was messing with the switch with the power still on and got a mild jolt. There is no doubt in my mind that power is going through the switch LOL. I finally look at the light again and it dawns on me. There is a pull chain for the light it self. I pull it and there was LIGHT!!!
I burst out singing TO GOD BE THE GLORY!!! And now I am going to bed
Wednesday, May 29, 2013
Installed Ceiling Fan in Master
We haven't actually finished installing the drywall right now the plan is to make it move in ready as soon as possible and then come back and put the finishing touches on it later. So today We installed the ceiling fan. Felt like it took 2 hours, the hardest part by far was aligning the screws for the blades. The design of this fan was by far the most difficult I have ever put up concerning fan blades.
After that was done I went and hit the switched and the lights didn't come on. I quit for tonight.
After that was done I went and hit the switched and the lights didn't come on. I quit for tonight.
Thursday, May 23, 2013
Monday, May 6, 2013
New additions
It would probably be best if gloria told this story but on May 6th 2013. Gloria discovered that 2 puppies were following their mom around the neighborhood. And then the two puppies decided to remain in our backyard. And so now we have 3 dogs. Below is a video/photo slideshow
Sunday, April 21, 2013
Raised Garden Bed
I had oringally planted some tulips I purchased on clearance ... I don't think they made it so no we have two raised garden beds. So far only the wooden square is in place.

Plan to plant a variety of salad greens :) Ignore the potted plant it was just an example.

Sunday, April 14, 2013
Plum Trees

SO... last year in the fall Walmart was selling these pathetically dry looking plum trees for only $10 each.
Even though they were half dead and we were in the middle of a severe drought in Kansas, we thought it was too good a deal to pass up.
That same day we followed the instructions on the tags and planted the first of our orchard trees. As the fall continued to be dry and hot we had to be really diligent in watering the trees.
And low and behold both trees made it through and are now springing back to life.
...The only problem now is that we lost the little identification tags and have no clue what type of plums we bought.
* LOL*
On the next post we will show our progress on the vegetable garden we are growing this year.
Sunday, April 7, 2013
100th Post!!!
We planted our spring garden!!! Really excited. However our camera is no longer with us still so no pictures.
Saturday, April 6, 2013
Dead Tree Removal
We started the cutting down of the two dead pine trees in our front yard. but alas our ladder is not tall enough and we will need to rent a lift to finish the tree.
Monday, March 11, 2013
Dining Room Table
We were blessed to receive a used dining room table. While used it works for us and we are thankful!
Sunday, February 17, 2013
Basement Work Table
Hey this is phillip, I am getting the urge again to build another work station table in the basement.
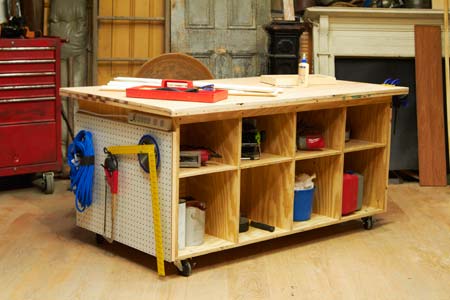
Last time in the previous post, I repourposed the old bathroom counter. And while it is working it is just too narrow. I can't even really fold clothes on it, much less use a hammer on an object resting on the counter.
I am thinking of something like tis
But it will be attached to the wall and have a kitchen sink!
Sunday, February 10, 2013
Chest Freezer
We purchased our first Chest Freezer!!! And just in time for some lovely bulk meat purchases!!!
Wednesday, January 30, 2013
Wednesday, January 16, 2013
Door Hardware Paint Removal
On one of my favorite websites they had a simple how to remove paint from hinges. After doing the baby dresser I quickly realized just how expensive these components are. This is a super easy way to remove the paint and most importantly I like it because it is way safer for my children in the house compared to using chemical strippers. The process is simple remove hardware, and cook over night in a crock pot full of a soapy water solution. Below is a video and also the link to the original article.
There was one step I was not able to do and that was use a beeswax polish. I just didn't know where to find it at here in town.
This Old House Link for How to Remove Paint Hinges
The hardest part was removing the paint in tight crevices. Even though I cooked the hardware for almost 24 hours! But the hardware did have multiple layers of paint and a lot of dirt.
One thing did break and that was a thing metal piece inside the door mechanism. So next time I want place every single part in. The door still works fine though. Also because old paint was removed, dirt cleaned off, and everything lubricated with graphite powder the door swing is silent now.
Saturday, January 5, 2013
Baby Dresser #2
We are in the final stages of preparing for child #2. Last summer while driving home from work I happen to see this old wooden dresser that was put out for trash. Well this winter we finally got to work refinishing it.
We reused the mistint paint from when we painted the column on the front porch (that reminds me I still need to build the second column).
Bringing the dresser home we filled in all the damaged areas with wood putty and then sanded using our random orbital palm sander. The sander we purchased was the cheap one from skilz for only $39. But trust me it is way better than trying to use either chemicals or *GASP* sanding by hand. Just take your time and use mutliple different levels of grit sandpaper to get the nice finish.
The most expensive part was the hardware. We could have went cheaper but by know I just wanted to be done with the project. Video below hope you enjoy.
Subscribe to:
Posts (Atom)