Pages

Tuesday, December 18, 2012

Carpet Install

Lowes is competing with Home depot on their carpet install prices so they lowered their stain master carpet to $0.98 per sq foot and the install for the whole house to $37. We also had to purchase the pad. Our total came to around $800 or so for the 3 bedrooms. Below is a slide show of the before and after we are still working on the master bedroom however because of the fact that our taxes will be increasing we will be holding off on home improvement until we get a handle on how our finances will be affected.


The Installation

The interesting thing working with lowes is that they hire independent contractors.  So they do not directly control everything but they do ... i hope that made sense to you.

Anyway the first step is the set up a time for the contractor to come measure the space. At the store the rep said they would  call and set up a time to come out. Well they called and said I am 5 minutes away can I come now? LOL 

After the measuring We went to lowes and paid for the carpet. The rep at the store said they would contact within a day or two to set up a time since they are really backed up right now. So we went home and I made plans to move the furniture tomorrow afternoon. Well they called and guess what? They were 5 minutes away and wanted to come right then! Well I hadn't move the furniture so we schedule for them to come at noon the next day. We ... really I had to move all the furniture out of each room that night. It was rough but we made it.

Carpet Vs Hardwood


You may be wondering why we decided to cover up our hardwood floors with carpet. Well it turns out for a toddler to learn how to walk that hardwood floors are slippery and hard. Our poor son's head will never be the same after so many falls. We drew the line when one day he rolled out of the bed fell, hit his head and threw up. The classic signs of a concussion. So now we have carpet in all the bedrooms. And area rugs in the main living spaces that we hang out.

So our next child will not go through (as much) as our first.

Sunday, November 25, 2012

Fall Garden Prep

When the first frost hit everything died in our garden so we decided it was time to start the fall prep for the garden. Because the garden did so well Gloria felt she would be able to handle a larger garden next year.

For next year she plans to plant

  • Melons
  • Squash/Zucchini
  • Strawberries
  • Bell Peppers
  • Onions/Garlic
  • Spinach
  • Lettuce
  • Corn
  • Tomatoes
  • green beans
  • Okra
That is a lot more than our tomatoes, okra, and ornamental peppers.

Gloria's Father was able to do the tiling for us which was a great time saver. I wish I would have gotten a picture. Below is a slide show of the plan and the tilled area. Again watch with your favorite song playing cause there is no audio in the video.


Monday, November 19, 2012

Column Install

The other day I was walking through lowes trying to figure out what was the best way to use the remaining part of my budget. As I was walking through the wood section I happened upon some 1"x6" for a reasonable price so I decided to build a column for the front porch.

While there I picked up a pint of some random color of exterior paint. I decided only to build one column first just to see how it turned out.


Lastly, I found some plastic numbers from Walmart. I don't like them but they will do for now. I hope you enjoy the video below. Feel free to have your own music playing in the background cause there is no audio.


Monday, November 12, 2012

Veterans Day

Did a google search and found the image below. No other words need to be said except Thank you!


Laundry Table Build

Gloria is getting tired of me putting the laundry on the couch in the family room (or is it our dining room ....) so time to build a laundry table in the basement. The problem is the budget for this project is


$0


So I must be able to build it using materials around the house. Thankfully during the bathroom demo I saved the old counter top. and I have some spare 2x4's

While the project is not complete see the budget above for the reason why I do have a functional work space. I intend to add an additional support in the middle, some 2x12's on the bottom for a shelf to store more things and a metal rod up above so I can hang clothes also while in the basement.


While building the supports I realized I only have a few long screws! I managed to find some in an old board. But maybe I can't screw straight but I screwed up those screws and bent them :( No pictures of that error.


I spaced my supports out so they would handle the 80" long counter (only like 20" deep) with ease. I do wish the counter top was deeper but oh well budgets. After installing the last support I realized I put it together wrong.


I wanted a 2x6 to run the length of the counter and to form a nice neat corner. You will see the error in the video below.


Saturday, November 10, 2012

Master Bedroom Update

Just a brief update as I am writing this we are 28 weeks into the pregrancy meaning I Only have 40-28=12 weeks to finish the master!

Most of the electrical rough in is installed I need to install the final exterior secruity light junction box, 2 outlets and pull the wires to the breaker panel. I also replaced all of the insulation (well not all of it but most of it almost done)

Lowes was having a sale on unfaced R-30 insulation so we purchased enough to redo the whole room. 


I still need to get some poly sheet plastic for the vapor barrier. Well I am off for now thank you for reading!

Wifi Router Relocation

Late one night I decided I need to relocate my wifi router. At the time we had our desktop PC in the bedroom which was at the other side of the house so the signal was weak. Even though we could still stream HD content on Netflix I wanted something better.

So I decided to use a long cat5 cable to mount my router to the middle of my house roughly. 


This did a number of things

1. I am not able to utilize more wired connections because before I didn't have enough outlets near the router.

2. We also moved the tv and the desktop FYI wired connections are almost always faster than wireless connections. ( unless you are using some really old stuff)

Slide Show Below


Friday, October 26, 2012

Gloria on Google fiber video

Thank you to my sister for spotting this video. Gloria made a cameo during the google launch party ours truly was featured


She is about 30 seconds in the video! So proud of my wife! She is truly an amazing woman of God who I am thankful for!

Saturday, October 20, 2012

Master Bedroom

We keep finding pictures of how to decorate the master for our idea board ... but we keep losing them somehow. So now we are going to try the cloud approach. Below is what we are currently shooting for as far as the colors.


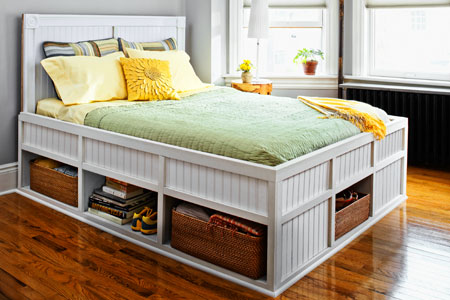
We won't have recessed lights but have a ceiling fan, nor will we have a sleigh bed or an armoire. Our bed will be something similar to this:


I am thinking to stain the bed a dark color or paint it black or ebony or espresso.


The patio doors will be a white linen, bamboo blinds for the windows.

No hard wood floors going for a nice comfy carpet.  The same color scheme will extend into the master bathroom. Where we have a light color tile for the floor. The accents in the master will be brushed nickle.

Friday, October 19, 2012

Toy Storage Continued

Sorry for the poor focus but the video above is another reason why we don't have storage.... maybe it is time to move some toys outside LOL!

Monday, October 8, 2012

Toys and Storage Needs

Two weeks ago we celebrated my son's 2nd birthday.
In addition to the cake and fun with relatives he also received a large amount of toys.
And not just any toys.
LARGE "WE DON'T HAVE ROOM" TOYS!!!!!!

For example:
 
 
This brand new inflatable spider man toy comes with many, many, many, many little plastic balls.  So in addition to being 3 feet tall and 3 feet wide, we chase balls all day long.  It also doesn't help that there is not more space in our son's bedroom to put the toy.
We also acquired a battery-power ride on truck, that propels are son into every wall, chair and furniture piece.  Luckily it only goes 3 miles per hour.
I have a sneaky fear that as we continue to grow our family that storage needs will increase as well.
If anyone out there has suggestions I am more than grateful to implement.


Monday, October 1, 2012

Craigslist Find!

So we were debating between buying a new crib or moving our son into a new bed.


Originally we talked  about getting a toddler bed. But I'm cheap so the conversation quickly switched to getting a twin bed. Then we made a pro and con list of the twin bed to buying a new crib. The crib we wanted cost about $160. We eventually figured we could build a bed for $100. Case close!

or so I thought...I just happen to be comparing prices on craiglist when I found a twin bed from IKEA for guess how much...yep $100. It even had the under the build storage m'lady wanted. And it had only been posted for less than a hour!  So needless to say we bought it. Pics will be coming soon!

Monday, September 24, 2012

i'm still alive!

So I have not written a post in a number of months.
OK... since July.
It's been a while, but I have a perfectly logical reason for the absence.  Phillip and I am expecting our 2nd child.  It's a boy and is due late January.
Because of my history, I was put on restrictive bed-rest almost immediately.  Thus no heavy lifting...and heavy is considered 10lbs.  No extended periods of standing or sitting...and extended is considered 2 hours.

Now with those restrictions its no wonder I haven't been able to contribute anything to the household so far. But what I lack in home repairs I have more than made up with appetite.

Behold my lunch:
Mmmm good.
(Note I shared with Phillip and toddler son)

Sunday, September 16, 2012

Air Compressor

Harbor Freight (an excellent store for guys who want cheap tools) had a sale on a small pancake air compressor.

This air compressor is 1/3 Horsepower, 3 Gallon, 100 PSI Oilless Pancake Air Compressor. Air Output at 40 PSI is1 CFM and Air Output at 90 PSI is 0.6 CFM. In other words very very small. However my goal for this is to only use it for simple trim work. So I purchased a 2 in 1 brad/finish nailer which requires 0.5 CFM at 90 psi. We had a spot where a piece of the cabinet is missing in the kitchen. At first I tried to use wood glue to put it back together but it just fell down once my son grabbed it.

Before:


After:
 The air compressor plus the brad nailer made this job so easy. It is true the right tool for the job makes a world of difference.

Monday, August 6, 2012

First Trip to the Dump

Sorry I was not able to take any pictures. The camera was MIA. Ever since we purchased the trailer, I have been loading it with the debris from the master bath room demo. On Saturday morning the trailer was fully loaded and I was ready to go. But the very first business of order was to get an idea of how my jeep would handle the additional weight. The very very first thing I noticed was my mpg was below 10. I headed over to the local elementary school parking lot and floored the gas pedal. It took a while but I managed to get to 30 mph. Then I slammed on the brakes. It also took a while to stop. But it was nice to have an idea of how long it takes me to accelrate and to stop. Two very very important features of driving. So now I am off to the dump. I have never personally driven to a dump before. I have been to one with my father when I was a kid. The only thing I remember was there was this long line because it was a free dump day for the citizens of our county. And there was some guy just in front of us who could not back up his trailer. It took forever. With that in mind, I was off to the closest dump. I took my time driving slow. I think my max speed was 55mph on the highway. Leaving plenty of space between vehicles 5-7 seconds sometimes. The jeep didn't seem to mind the load. I really wish I had a transmission temp. guage. I arrived at the dump with out incident. The clerk at the dump said that a trailer my size would cost $58 to dump. The ticket said my trailer had 3000lbs in it. I doubt it especially since it wasn't weighed empty. Anyway the clerk said I had two options I could unload it at the customer spot but I would have to lift everything out of the trailer into the dumpster. The second option was to drive into the landfill and just push it out the trailer. I chose option 2! so off we go, up the hill into the landfill. The clerk gave me the directions which seemed really simple. Nevertheless i screwed it up. And ended up by a mine blasting section! Talk about being nervous thankfully they weren't blasting on that day. So I just turned around and got back on the right track. As soon as I hit the gravel road I was really thankful for my 4wd while pulling my load. After asking a number of employees who were all really helpful I managed to get to the actual landfil. And low and behold driving in reverse in a landfill is not as easy as in a parking lot LOL. I didn't take as long as the guy from when I was a kid but It did take me two times to get to where I wanted. While saying I just had to push everything out of the trailer is easy. The Task was longer and more ardous than I originally planned. And then at some point I noticed the side of my trailer was coated in a crismon red. Turns out my hand was bleeding. I have no idea how it was bleeding. I didn't feel anything poke me but I was bleeding. And a lot more than I normally bleed. Glad I got my tetnaus shot. I finished unloading and cleaning out the trailer. And drove to a store to buy some gloves. My finger still hurts to bend. Starting to wonder if I tore something in my joint. Total cost to dump this stuff $200 for the trailer and $58 for the actual dump for a total of $258. While at first that seems really expensive. I know we will use the trailer for more things in the future such as buying furinture, and bathtubs and other stuff. So everything was worth it in the end.

Tuesday, July 31, 2012

Printer Buying

synopsis: We purchased a laser printer, with an Ethernet port for less than $90. The printer will print about 700 pages and then we purchased an additional toner for $30 that will do another 1200 pages. Long story: Recently we have not been posting much because our son was in the process of dismantling our laptops. As such we purchased a new desktop computer along with a new printer. I decided to do a post about the printer. Because Gloria and I came to the realization that we needed to pay attention to what we used our printer for. Previously we owned an ink jet all in one type printer. Where it can scan, copy, fax, and print in color. It also had built in Wifi. The problem with ink jets is while the cost up front is low if you print say Google maps fairly frequently your ink disappears really fast. At first this wasn't a problem. We didn't think we printed that much. Well to date (Gloria may have to correct me on this one) I think we had to replace our all four (4) of the ink cartridges in our printer about 3 times. At about $20 per cartridge 4 x 20 = $80 for each change $80 x 3 = $240 for all the ink we purchased. It was and is painfully clear we needed a different solution. The first thing we did was ask the question do we have to print in color? The vast majority of our printing black and white is fine. Our next question is do we really need to scan/copy/fax? We don't even own a home telephone so we have never faxed anything. We have used the scan feature when dealing with photos. And we have used the copy feature. But then we realized we can continue to use our existing scanner/copier/fax even if it doesn't have ink. So we don't need those features in our next printer. The final question is do we need it to be a networked computer? Because our son who is currently hitting his terrible twos. We will be down to one desktop. So a network setup isn't necessary. However I wanted it and thats that LOL. So off to the store I go. The particular store we went to only had a handful of laser printers. I was really surprised to find the Brother HL-2270DW for less than $90. From the website "The Brother™ HL-2270DW is a monochrome laser printer that offers an automatic duplex capability for printing two-sided documents with ease, fast printing at up to 27 pages per minute, and built-in wired and wireless networking for sharing with others. It features a stylish, space-saving design that complements virtually any environment. In addition, it offers convenient paper handling via an adjustable, 250-sheet capacity tray‡. To help lower your operating costs, a high-yield replacement toner cartridge‡ is available." I was really really happy to finally have a printer that I don't feel like I am constantly reloading the paper tray. Sometimes I felt like our previous printer only held like 50 pages. The most important feature I like is the wired ethernet port. While Wifi is nice, lately I have come to prefer wired connections. They are faster, and more reliable. One thing I did not like about our printer is that the power cord did not fit snugly into the back of the printer. Thankfully it is just your usual power cord that has been used on desktop computers for as long as I can remember. So I just swapped it out with one I had. Set was a breeze. And I really like the 27 ppm. Gloria called me at work the first time she printed something. She said she hit print and got up to walk away because how long our ink jet normally takes. Before she got a few steps away it was done! I hope to have a long and lasting relationship with this printer. And since it is a wired network printer it is ready for when we expand and buy gloria her personal laptop or tablet.

Thursday, July 19, 2012

Bountiful Harvest

We have been tremendously blessed with our garden. We have so many cherry tomatoes that we don't know what to do with them. And then the other day while going to the local hardware store they had a garden magazine. And it turns out that there is a local church that has a free farmers market where they take donations from people to give to those in need! Gloria and I are really happy we found a use for the produce and plan to give our produce away to the farmers market. who knows maybe one day we will organize one in the inner city to provide fresh fruits and vegetables to the inner core of the city.

Tuesday, July 17, 2012

New Trailer Update!!!

We purchased our trailer. While it is used we are happy. In fact I already loaded it up with debris from the master bathroom demo! I spent the evening driving around in the parking lot next to the school just seeing how my vehicle's handling characteristics have changed, and of course I spent a lot of time driving in reverse. I must say this is by far the easiest trailer for me to drive. I would post a picture but the laptop we use to upload pictures A/C adapater died. Debating if we want to purchase another one. Last time the connector broke when the laptop fell off the coffee table. so we purchased a A/C adapter from amazon for like $8. Well now that one died. So our laptop has no power. A new one from toshiba costs like $80 however a lot of people rated it low because they said they fail! Talk about being stuck between a rock and a hard place.

Saturday, July 14, 2012

Trailer hunting

We are currently on the hunt for a trailer. To get ready to purchase bed room furniture. The budget is tight but we will have to make it work. Hopefully soon we will have an update with a picture.

Saturday, June 16, 2012

Urban Garden

Veg-e-ta-ble gar-den:: noun, a plot of land where vegetables grow


Today on TV you can't help but be told that composting and growing your own garden is the penacle of going green.  It's supose to save you money and the enviroment all while giving you the freshest organic foods known to man.
What they don't tell you is that you are NOT saving time.

This is a picture of what I thought gardening was going to be like:

Vegatable Garden I thought I was going to have


This is a picture of the little side garden that I currently have:

1 row is growing...the rest is dead


I water the garden at least 2 times a week if it has not had a good rain during the week.  I de-weed at least 1 time a week and I try not to kill anymore of the plants the rest of the time.

This is a picture of our compost bin:


So far it only has yard debris in it.  I haven't gotten an on-the-couter cannister yet, but I'm hoping that I can start adding more variety to the compost here pretty soon.  My plan is to have a small cannister on the kitchen counter that I can put my throw away food parts like banana peels and egg shells, collect it for a week, then we I put out my trash and recycling on trash day I'll just take the cannister and put it in the large compost bin outside.
Just leaves and sticks


Fu-ture gar-den:: noun: a time that has not yet arrived for our garden


Ever since I was in college I remember realizing that I'm very much a conservative, traditional woman.  I like being a stay at home mother.  I enjoy making homemade bread, I even watched many eposides of "Little House on the Prairie".  So it's not too surprising that I desire to have a flourishing garden and an acre of fresh fruit trees.  If you remember a post Phillip put up a few weeks ago...http://www.n43rd.blogspot.com/2012/05/orchard-planning.html
Then you would easily figure out that it was my desire to even own this much land.
This is a picture of what I want our future garden to look like.
Orchard of my dreams
This is a picture of what we have so far:


Current orchard...none of the trees are fruit bearing

Monday, June 11, 2012

Master Bedroom

In the previous post "Existing Master" we uploaded a video showing what our master looks like right now using google sketch up.


Today is another video showcasing the existing layout along with 3 proposed ideas. We didn't come up with anything crazy and most truly revolve around where to put the bed.


Note: In the following video it is possible to see the other floor plans because i was not careful to make sure that the different walls did not intersect. As such as you are watching the video you will see some places where it shows the exterior wall of a different room, or a piece of furniture is sticking through the wall. 


So which one do you think we chose?!?!?!


I personally liked the floor plan with the TV. I really liked moving the closets. However in the end my beautiful wife has a way of getting her way as such. Gloria decided to go with Floor plan number 2. The closet will not be made out of wood as it is shown in the video. I just placed that there so we knew it was the closet. It is my understanding that she really liked all the bookshelves and the fact that I added pictures.


The current goal is to have this complete by Christmas ... Just don't tell Gloria cause she will hold me to that LOL

Monday, June 4, 2012

Stuck Door

So our son is learning how to open doors. And we discovered that the door that leads down the stairs to the basement is stuck. Meaning it does not latch properly. Below is a video of the fix.


After making this video I realized we really need to get around to cleaning up that door and painting it ... 

Tuesday, May 29, 2012

Lawn Mower Tires

Last weekend noticed the tires on the lawn mower were getting a little flat. However we do not own any form of an air pump. :( This weekend I go to pull out the lawn mower and realize it is a little harder than usual. Lo and Behold the tire is completely flat. I push the lawn mower back into the garage.


At this point I have two options.
1. Purchase an air pump (and hope the tire does not have a hole in it)
2. Remove the tire from the lawnmower and take it to the gas station where I can use their air pump.


I wanted to chose option 1 but the budget does not allow for it right now. So Option two until next pay check. I raise the lawn mower rear tires off the ground and I proceed to remove the retaining clips for the lawn mower and give the wheel a firm pull. 


Nothing
I spray the axle with penetrating oil and call it a day.


Day 2
I grab a 2x4 and wedge it between the tire and the frame to pry the wheel off.


Nothing


I go out side and pull out the scissor jack from my wife's car and wedge it between the tire and frame.


Nothing


I take the 2x4 and pull out my hammer and start wailing away.


Success!


But after about an inch or so it stops again


I spray the axle with penetrating oil and call it a day.


Day 3
I'm a little upset now ... thinking I really should have just purchased an air pump and called it a day. I pull out my sledge hammer and hammer the tire back to its original position. I spray everything again with a liberal coating of penatrating oil and this time use the 2x4 with the sledge hammer


About 10 powerful hits that would make John Henry smile. The tire came off.


I place the tire in the car and that is the end of Day 3


Day 4
After work I stop at the gas station on my way home that has free air and air up the tire. All seems well and return home. As I am putting the tire on I hear a small hiss and realize there is a crack in the side of the tire. :(  
I put the tire on anyway hoping to finish cutting the grass before it goes flat again. I get about 2/3rds of the way when I turning the corner and tire separates from the rim.


I push the lawn mower back into the garage.


Day 5
I woke up before work to see how much it would cost to order all new tires. The total ... $334!!! Maybe I am too cheap but I can get tires for a car for $70 a piece! Now I have to find a cheaper way to get new tires. I do not want to use any sealant type stuff but that may end up being the solution.

Tuesday, May 22, 2012

Existing Master Video

Above is a video created using google sketchup of how our master suite looks right now before we did any designing.

Tuesday, May 15, 2012

Orchard planning

Now that the plan for the front humming bird garden is in place time to starting doing a little more long term planning which is our orchard.


This orchard has been something Gloria and I have always talked about. I am not even certain how we got on the subject but I can imagine it had something to do with the fact that Me and now my son will eat all the fruit in the house and Gloria was tired of not being able to get any cause we ate it too fast.


So when we purchased this house we knew having land was important. Which is why we have over an acre of land for our small fruit orchard.


Now I must admit I am new to this so the plan is more than likely to change. Especially since I do not fully understand how pollination works and how to manage it properly.


Step one clear the land!
Below is an old picture from 2010 of what our land looked like. As you can see about half of it is covered in trees.


The portion boxed out is the area that will be deforested.


After removing the trees we should have something like this.
 Finally time to map out the trees. Our lot is 100' wide roughly and most trees require between 20-30 feet for spacing. I would like to not have the trees drop fruit over the property line. So all trees need to be within 10' of the property line. So now the width is only 80'. Assuming 20' between each tree we can have up to 5 trees per column. I plan to start out with only 3 threes per column. With a lot of spacing to make sure they get plenty of sun and to bring down the cost of the irrigation system. So we should have something like this.
The trees I would like to plant are:
moonglow pears
ozark premier plums
glohaven peaches
yellow glass cherries
fugi apples (my favorite)
gala apples


and maybe the paw paw fruit since it is native to these parts.


Well I'm off to do more day dreaming!

Monday, May 7, 2012

Front garden area

Starting to plan the garden area for the front porch. So far I have develop a google sketch up model to lay it out.


Its really a simple model. So far the goal is to have a planting area next to the stairs that provides cut flowers through out the growing season. Since we live in a zone 5b it will be little interesting. The other thing I am thinking about is that my wife and I saw a humming bird come to our front porch. We may incorporate some flowers for the humming birds and butterflies in the neighborhood.


Each green space beside the stairs is roughly 9' x 6'. At the far left side of the picture next to the overhang is where the gutter comes down (sorry I didn't draw it in) but I plan to add rain barrel here to collect water to water the plants.


Because the porch is floor is about 4' off the ground. I want the tallest plants roughly 4'-5' tall.


Below are some of the flowers I am thinking about:


Cardinal Flower | Lobelia cardinalis


Life Span: Perennial
Mature Height: 3.0'
Mature Width: 1.0'
Flower Color: Red
Sun Requirement: Full Sun to Part Sun
Water Requirement: Wet to Moist

Foxglove Beardtongue | Penstemon digitalis


Life Span: Perennial
Mature Height: 2.0'
Mature Width: 1.0'
Flower Color: White
Sun Requirement: Full Sun to Part Sun
Water Requirement: Moist to Medium

Large-flower beardtongue | Penstemon grandiflorus


Life Span: Perennial
Mature Height: 3.0'
Mature Width: 1.0'
Flower Color: Pink
Sun Requirement: Full Sun
Water Requirement: Drained to Dry

Showy Beardtongue | Penstemon cobaea


Life Span: Perennial
Mature Height: 2.0'
Mature Width: 1.0'
Flower Color: White
Sun Requirement: Full Sun
Water Requirement: Drained to Dry


I plan to place the large and showy beardtongues on the right since they are both drained to dry for water requirements. And the foxglove and the cardinal on the left since they both need more water. It also helps that the foxglove and the cardinal do not require as much sun light.

 I still have not decided on my filler plants more than likely they will be Gerberas or Carnations or tulips or daffodils. I need some sort of greenery I supposed. Clearly i have not made up my mind yet. 


Monday, April 30, 2012

The Plumbing Saga Continued for the mastered

We finished installing all new plumbing throughout the main house in 2011. However there was portion where an addition was built that I left the copper in place.
Which was a terrible mistake.
Evidently something has built up inside the copper lines that is clogging the line. This happened each time I connected the line. So the moral of any story when it comes to remodeling is to cut it out and replace.
Aside from the water no longer working to the master bathroom sink. The master bathroom sink drain is clogged. I attempted to use a liquid drain cleaner but to no avail. the sink simply filled up and it sater there all night. It didn't drain one bit. I attempted to use a plunger hoping! But my hope was in vain. My next plan is to disconnect the drain line to where the sink and the toilet tie in together. Because the toilet has no problems but the sink does. So I assume the problem is in between the two. If the piping is old cast Iron I will cut it out and replace with ABS.
My only goal right now is to establish a firm foundation where upon my beautiful wife can decorate without having to worry about me needing to open up a wall to replace something that is broken.

Sunday, April 29, 2012

Siding Saga

Spring is in the air and spring/summer is a great time for outdoor projects. While walking around the house I realized i still need to paint. Which was when I had an ah ha eureka moment!


I thought it would be grand to replace the portions of our house that had wood siding with vinyl or fiber cement siding.

I turned to Service Magic to quickly get in contact with companies that do siding. As I was filling out the forms on service magic's website I put that the project would not take place for at least 6 months and that this was really more of a request to get an idea for a budget. Within 24 hours I was scheduling appointments. And this is where the problems started. Below is a typical phone conversation

Company Rep: Hi, may I speak with Phillip?
Me: This is phillip
Company Rep: We received a request through service magic and would like to schedule your free estimate.
Me. Great!
Company Rep: What day and time works best for you
Me: Wednesday evening
Company Rep: Okay that will work. Are you Married?
Me ... pause for a second ... : Yes
Company Rep: Would your wife be able to there while our representative goes over the options with you?
Me: No she works during that time.
Company Rep: Is there a different day that would work best for both of you?
Me: No, she works evenings and I work days so the little time during the week we have together we do not schedule any thing.
Company Rep: Ok, well we can understand that but we really need both of you their would you like us to contact you later when there is a time that will work?
Me: No, that is okay there are other businesses that are coming have a nice day.
Company Rep: oh okay goodbye.

To be fair not every company was stuck on forcing my wife to be there with me. All of them did ask for her to be there and I understand why they would ask. The companies that did show up were prompt and very knowledgable about their various products. However what I was not ready for was the pushy salesperson. I forgot about how high pressure sales tactics work. I think at one point a sales rep faked a phone called at 8:30pm on a friday night to his supervisor to see if he could offer me 0% interest for 24 months if i signed up for siding that night.  

I eventually managed to weed out the companies that were set on having both me and my wife there, made it over the hurdle of the high pressure sales tactics to finally arrive at the price. The work ranged from $6,000 to $15,000. 

Moral of the story: Three 5 gallon bucket of paint every year is cheaper than 20 years of siding.


Tuesday, April 10, 2012

spring is here!!!

Sorry for the delayed posting.
It's been a busy first quarter for us.
So it's April now... that means periodic rain showers and sunny warm days. I don't know what better time to do outdoor work.
1st thing on the list: BUSHES MUST BE MOVED!!!
We had bushes on the front and side of the house that were ugly and overgrown. It was obvious whoever owned the property before us did not care for the house or the land very well.
This fall when we had nice weather Phillip and used a hand chopper and cut large chunks from these bushes but the chopper broke mid way in the process so we stopped.
With our tax refund in hand we purchased a gas chain saw and a trimmer along with a few other household maintenance accessaries.
Below is a picture of Phillip removing the stumps after finishing them off withthe chain saw:

Removing stumps using your 4x4 vehicle is always fun!

Tuesday, March 20, 2012

Clogged bathtub

I woke up Saturday morning with Gloria, my glorious wife, proclaiming that the bathtub was draining really slow. I took one look at it and knew that the trap was in the process of becoming clogged. Our house featured an old bottle trap for the bathtub.


I was really sad because we just finished putting in the drywall and I did not want to tear it all out ... so I decided to only replace the portion from the bathtub to the main drain. I really don't like to do that because we will inevitably have a problem with the toilet or something and need to replace everything.


Nevertheless Gloria left for work and my Son and I went to the locale home improvement store to get supplies. I wouldn't be able to do the actual work until just before the store closed so it was imperative that I got everything to cover every contingency.


Gloria comes home from work and I start working. Two quick cuts with my  reciprocating saw and the piping below the floor is gone. I start to remove the tub drain and quickly realize I did not purchase the tool needed to remove the tub drain.


So off to the store to buy the tool in the picture. I quickly return home in the hopes of getting this part done just in case I forgot to purchase something else. I inserted the tool and started to attempt the remove the drain. The keyword is attempt. This quote unquote superior tool was no match for this tub drain that must not have been removed since the house was built. One of the parts of the tool snapped. :( so I had two options return to the tool right then and get another one and try again or attempt to cut the drain out. I  decided to wait and attempt to start installing some of the other piping that would go to the drain. When I realized that I had the wrong size connector. Just then my wife realized she was supposed to give someone are ride to work so I called it quits and left with her. When I got back I pulled out the reciprocating saw and managed to remove the tub drain without damaging the bathtub too bad. I followed the directions for the new tub drain exactly with out measuring. When I went to connect it to the tub it put the drain right on top of a joist and the overflow was too tall. But I had already cemented everything together so I needed some couplings to cut the pipes in half to adjust for the fact that this is an old tub and by no means is it standard.  And that ended Day 1 of no bath since I didn't have the material I needed to finish.


The next day was Sunday and I didn't bathe. Talk about being self conscious I was walking around trying to stay down wind of people when I was outside and making sure I didn't stand too close to anyone at church. Right after church I stopped at Lowes and purchased the correct size couplings. While there I also purchased 10' of 1-1/2" ABS, a p-trap, and an flexible coupling as a gift to myself.


But we had another worship service that afternoon. When we finally got out of church and we were invited to my Father-in-law's birthday dinner. So off we go to the birthday dinner after hanging around for some time I look at the time and realized my favorite home improvement store, Lowes, is closed. And tonight was do or die this tub had to go in even if that meant i put a water hose as the drain to make it work.


Oh by the way did I mentioned that because of this repair work the toliet sometimes would flush some water to the basement :( smh


I quickly made my measurements on the tub drain to modify to standard kit to fit our bath tub. Ba Da Bing Ba Da Boom done. I then dry fitted the p-trap and the rest of the pipe to ensure a proper slope to drain the bathtub and to reconnect everything. Less than 30 minutes in total to finish the project. I was really proud of myself but I hadn't tested for leaks yet.


However it was time to work on my gift to myself. See the reason I knew the bottle trap was on it's way out was because the bottle trap that went to the washer machine did the exact same thing. Except I never fixed the washer machine's bottle trap. How was I doing laundry?


Well I'm not saying anything about how I managed the laundry. So while the glue for the bathroom was curing I removed the bottle trap to the washer machine, and cut out a large piece of the old pipe. Then I ran a piece of metal inside the remaining pipe all the way to the stack just to make sure there weren't any other clogs. I put everything together and now I have a proper drain for the washing machine.


Back to test for leaks for the bath tub. Turns out I put the rubber gasket for the tub drain on the wrong side, I had to tighten the flexible coupling to the old cast iron pipe, and I had to adjust the trip lever to get it to function properly.


I then started a load of laundry to test the washer machine only to discover I forgot to tighten the p-trap. But everything else was great. I was upstairs playing on the internet when all of a sudden I hear a sudden down pouring of water. I jumped up and started running. A spin move around my bass guitar and amp, a hurdle over my son's tricycle, I open the door to the basement taking the stairs two at a time and run to the washer machine. I'm looking it over trying to find the water only to realize. That the water I heard is because there was a rainstorm outside. LOL


I went back upstairs took a bath and went to sleep.

Thursday, March 15, 2012

House History

Yesterday afternoon as I was walking into the house from doing some yard work my neighbor from two houses to the north flagged me down. We briefly discussed some of the recent events in the neighborhood and then she proceed to revel to me that it was her Uncle who built our house! Before she was born her Uncle built the house. Back then our house was actually considered the country. Her uncle had Shetland ponies which he kept and a garden. The little guest house we have behind the house was actually a barn! Which explains quite a bit about the roof. He also had larger regular size horse further west in a pasture. After a few years of living in the country he decided to move into the city.


A lawyer/banker purchased the house. The lawyer/banker and his wife were avid gardeners. His wife had a really large strawberry field, and they grew grapes along the fence along with all your other usual garden fruits and vegetables. During the summer they would host large family gatherings and they had a large brick outdoor grill. It was during this time that the barn was converted to a house and the master bedroom and patio was built. I always knew that it was an addition so it is nice to know who built it. The lawyer/banker and his wife also used the fruit cellar in the basement to make wine. The husband had German shepards and his wife had a yippee little Pomeranian. Evidently they would sit out on the back patio with their dogs and look out over the land. I'm sure this was all before the highway was built.


Finally a mechanic purchased the house. He did not take care of the plant life or the house for that matter. He was a tall heavy guy and after many years of working on cars his back gave out and he had to give it up. His wife used the guest house as a daycare.


And then we purchased the house in 2011.


It is always great to know your history.

Monday, March 5, 2012

Random Projects

Taking a quick break from the bathroom to do some random projects through out the house.

First Gloria decided we needed to finally install some hardware for some drawers in the hallway. Then we decided that it was time to replace the original porch lights since they were half filled with bugs and yellow and not that bright. Finally I resumed work on the bathroom in the dark (I had the power off since i was doing some electrical stuff also) putting in an additional stud. Well the last picture will show you what happened on the opposite side of the wall. Enjoy the video

Monday, February 27, 2012

Built-in Bookcase Design

Gloria and I love to read, and we are running out of space for books. So we decided to plan to add some more bookshelves. The first few pictures are of what one of the corners looks like now. After that is the video showing sort of what we are planning. Enjoy!


Monday, February 20, 2012

Stuffing

Want to hear a story?
In the beginning there was a young couple.
This young couple was happy but sadly broke. They wanted a new, soft and comfy couch but couldn't afford it. So the young wife sat down one day and said, "Dear husband of mine, I want a new couch, but I know our budget does not allow that luxuary. What if we just stuffed and fluffied the old couch cushions instead?"
The young husband said, "Wonderful idea. I will not help, but I will take pictures for you."
And thus began the process of stuffing the couch.
Step 1: Get cushions and bags of stuffing (5 bags of polyster stuffing from Joann's Fabrics)
Step 2: Stuff
Step 3: Sew closed and put back on the couch
The end of the story:
The happy couple lovingly sits on their re-stuffed couch and happy marriage bliss!
The end

Sunday, February 12, 2012

The truth about Hardwoods

Hardwood floors are beautiful and long lasting. Currently today hardwood floors are back in style and many times when a first time home buyer is looking for a home the first thing they notice is beautiful hardwood floors.

When my beautiful wife and I started looking for our home we wanted hardwoods through out. We originally wanted something similar to this:

While we didn't get that we did get hardwood floors throughout our home and we discovered that when a baby first starts trying to walk they fall .... A lot! And hardwood floors do not provide any sort of cushion. So sadly today since we are planning to eventually have more than one child we decided to put in carpet in most of the house. Another factor that played into this was the expense of refinishing our exisiting hardwood would be comparable to installing carpet.

Monday, February 6, 2012

Cleaning the garage

This is Phillip, and for the record I am a slob. I am terrible about cleaning up. When I try to clean up around the house my wife has to do it all over again cause I am so bad. Nevertheless today I embarked on cleaning the garage. After multiple car repairs in the garage all my tools have been thrown all over the floor. I wasted so much oil and other chemicals that most of the garage floor is covered in kitty litter as an attempt to asborb the chemicals. I have random trash just all over the place. In short that garage is a pig sty.


So I started cleaning. The first order of business was to pick up all the tools out of the kitty litter. Let me just say I learned a valuable lesson concerning keeping a clean work space. I was crawling around on my hands and knees looking for multiple 1/16 cobalt drill bits that are covered in kitty litter. Not Fun At All!!!

After collecting all of my tools in one spot, now it was time to organized them. Thankfully I have three large upper cabinets attached to the wall in the garage. All the chemicals went to the top shelf so they are faraway for any children. Other tools were group accordingly on different shelves. Now that all the tools were picked up time to tackle the kitty litter. I grabbed my trusty push broom and my snow shovel, interestingly enough we haven't had a real snow so my snow shovel has only been used as a dust pan this year. As I was finishing the kitty litter I get a phone call requesting some help on a different project.

And once again I live up to my heritage of being a terrible cleaner, the garage still isn't clean.

Sunday, January 29, 2012


And the paint brand winner is:


This is the paint we will be using in both the bathrooms and kitchens, because it's very durable.
Now for the moment you all been waiting for... What shade of beige won?

Here we have 3 contenders.

  1. Lyndhurst Timber (2007-9C):


2. Lyndhurst Gallery Beige (2006-10B)


3. Oatland Subtle Taupe (6005-1B)


I know they are look very alike...but that's the point. I couldn't find the 'right' beige.
But after days of looking at the shade in daylight, at night and everywhere in between the hands down winner is:
(drum roll)
*** very long pause***
# 2 lyndhurst gallery beige (2006 -10B)

This will eventually be the color for both the bathroom and the kitchen.